Wed’s Help
The following help covers the basic features of wed. There are some important caveats to keep in mind when reading this documentation.
First caveat. Wed is designed to be an XML editor that provides on the fly validation, and only this. Consequently, wed has no notion of a “document collection” and provides no means to load documents from a collection or save documents under some name into a collection. Functions such as these are to be provided by the larger application in which wed is being used. The following documentation does not cover the functions which are outside the scope of wed.
Second caveat. The functions of wed are exposed to the user through editing modes (usually just referred to as “modes”). It is possible to use wed with custom modes that present the document differently from what the generic mode does, or include toolbars, menus, dialogs, etc. The following documentation covers only what the generic mode (bundled with wed) provides. Custom modes will have to provide their own documentation.
Third caveat. Make sure that wed is supported on your browser before filing a bug report. See Browser Requirements.
Editing Controls
Wed divides the screen into various areas.
Toolbar
Above the validation progress bar, wed presents a toolbar that allows to perform some operations through the mouse.
Note
Wed does not include in the toolbar a button for every single operation that may be performed through the keyboard. It includes only some operations by default, and modes may add more custom operations to the toolbar.
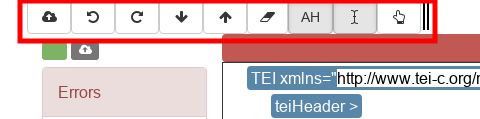
The default toolbar.
If you hover the mouse pointer over a button, you will get a prose description of what the button does. In the image above, from left to right the buttons perform the following actions:
- Save the document.
- Undo.
- Redo.
- Decrease the label visibility level.
- Increase the label visibility level.
- Remove markup from mixed content.
- Toggle attribute autohiding off and on.
- Set the selection mode to span.
- Set the selection mode to unit.
The attribute autohiding button is a toggle. When autohiding is on, the button is pressed down, as shown by shadows. When autohiding is off, the button is flat, as shown by the absence of shadows.
The buttons that set the selection mode are mutually exclusive. The button which corresponds to whichever mode is active will is pressed down.
Mode-specific buttons may appear to the right of the double bar. The buttons that appear there are those that correspond to the mode in effect at the caret location.
The Validation Progress Bar
As you edit your document, wed validates your document according to the Relax NG schema that was specified when wed was started. Whenever you make a change to the document, wed revalidates the document.
Note
At the moment, wed itself does not provide a GUI to select different schemas. It is up to the software that uses wed to provide to the user the means to select a schema. How to do this depends on the needs of the project. For instance, wed is used in BTW to allow the editing of scholarly documents. There there can be only one schema in use and thus no need to ask the user to select a schema.
The validation progress bar is located above the editing pane. The image below shows the general location of the bar.
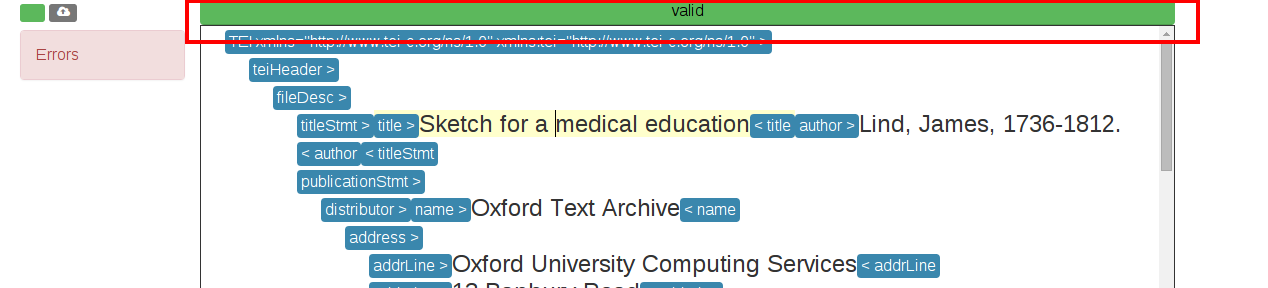
The location of the validation bar.
When an document is first loaded, or when a revalidation occurs, the bar starts empty (all white). It is progressively filled with color as validation proceeds. For small documents, validation will occur very quickly and consequently the user will see the bar instantly fill to completion. The color of the bar and the status that appears in the center of the bar will vary depending on the results of validation.
The bar will be green and the status will be “valid” if validation is complete and the document is valid.

A validation bar indicating a valid document.
The bar will be red and the status will be “invalid” if the document is not valid.

A validation bar indicating an invalid document.
The bar will be blue and the status will be “working” as long as validation is not complete.

A validation bar indicating the validation is not complete.
There is also a “stopped” status, which you should never see.
Modification and Save Status
On the left side of the screen, at the top, wed shows you the modification and save status of the document being edited.
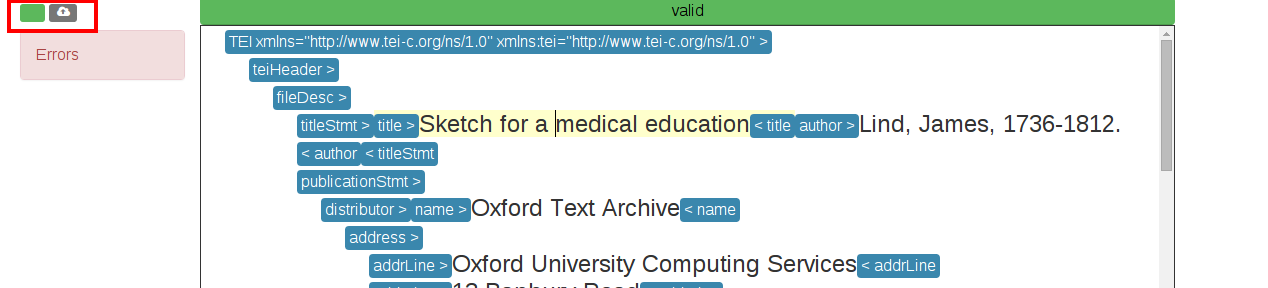
The location of the modification and save status.
The rectangle on the left is the modification status. A green modification status indicates that the document has not been modified since it has last been loaded or last saved. To the right of the modification status is the save status. It starts gray to indicate that the document has never been saved during the current editing session.

The status shown for a document that has not been modified since last loaded and has not yet been saved in this editing session.
When you modify the document, the modification status becomes orange and contains an asterisk to indicate that the document in the editor has modifications that have not been saved yet.

The status shown for a document that has been modified since last loaded and has not yet been saved in this editing session.
When you save manually (for instance, by doing Ctrl-s), the modification status returns to green and the saved status becomes green. The saved status also tells you how long ago the last save occurred. Hovering on the save status brings up a tooltip telling you what kind of save last occurred: autosave, or manual save.
Note
The delay between autosaves is configurable, and can be turned off by the application which makes use of wed. The availability of autosaves and the delay between autosaves is determined by the application which makes use of wed for editing.
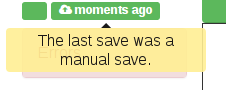
The status shown for a document that has been manually saved moments ago.
The save status will update periodically to show approximately how long ago the document was last saved.

The status shown for a document that has been saved almost five minutes ago.
The Error Pane
On the left of the screen, under the modification and save status, you can find the error pane. This is where XML validation errors are shown to the user.

The error pane.
The error pane is collapsible. It can be collapsed or expanded by clicking on the pane’s heading. Clicking on error markers in the editing pane will expand the error pane. Clicking on an error description in the error pane will scroll the editing pane to the location of the error. It will also make the error “selected”. The selected error has its description blinking in the error page and has its error marker blinking in the editing pane.
Clicking on an error description scrolls the editing pane to that error.
The Navigation Pane
The navigation pane is a basic functionality of wed but will be visible only if a mode makes use of it. The generic mode does not make use of the navigation pane. The generic mode is meant to be truly generic and thus does not know what elements serve as section headings in a document. Therefore, it does not know how to build the content of the navigation pane. So if you are using the generic mode, you won’t see it.
Custom modes that make use of the pane will show this pane under the modification and save status, above the error pane.
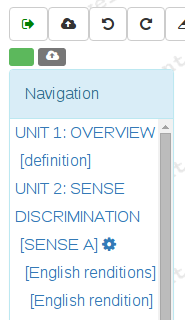
The navigation pane.
The user can click on the headings in the navigation pane to quickly scroll the editing pane to the corresponding area of the document. Some modes may also support bringing up special contextual menus on the headings of the navigation pane.
The Minibuffer
As the name suggests, this is inspired by Emacs’ minibuffer. However, wed’s minibuffer is much more primitive than Emacs’. The minibuffer is a space that wed uses to quickly prompt for input instead of bringing up a dialog box. It allows for quick operations like quick searches. When it is not in use, the minibuffer is empty. A prompt appears there when wed prompts the user.

The minibuffer.
In the example above, the minibuffer is prompting the user for a quick search, forward in the document.
The Location Bar
The location bar appears right under the minibuffer. It indicates the hierarchy
of elements that contain the caret. Each XML element in the hierarchy is
separated from the next by a forward slash (/).

The location bar.
In the example above, reading from the end of the location bar, the caret is
located in a note element contained by a notesStmt element contained by
a biblFull element, etc.
The Editing Pane
The editing pane is where the document being edited is displayed and where most changes to a document are performed. It appears under the validation progress bar, above the location bar and to the right of the error pane.
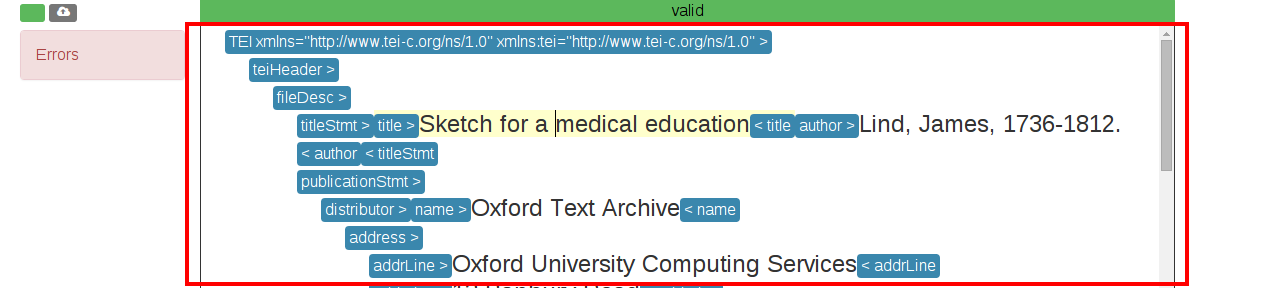
The editing pane.
If the document is too long for the space given to wed, the editing pane will show a scroll bar on the right that allows scrolling the document.
We will now go over each distinctive element of the editing pane.
The Caret
The caret indicates where the document is being edited. It is a blinking vertical bar. It can be moved by left clicking. When the caret is already in the document, the arrow keys on your keyboard can be used to move the caret.
The caret can be moved with left clicks of the mouse or the arrow keys.
The element that contains the caret also acquires a pale yellow background color while the caret is in it. Only the element which immediately contains the caret acquires this color. The elements that contain this element do not change background color.
Placeholders
Empty elements contain placeholders. The placeholders are meant to help users easily put the caret in empty elements. Without the placeholder, the start and end labels of empty elements would be immediately adjacent, and getting the caret between them would be more difficult. (It would require clicking on the start label and moving right or clicking on the end label and moving left.) When an element is edited to contain text or other elements, it loses its placeholder. When an element is emptied it gains a placeholder. When the caret is in a placeholder, the placeholder blinks to indicate that it contains the caret.
The hi element gains a placeholder when the text is removed,
and loses the placeholder when text is added back.
Placeholders also appear as the value of those attributes which have no value set.
Element Labels
By default, the generic mode bundled with wed shows the start of each XML
element with a start label, and the end of each XML element with an end
label. The start and end labels can be distinguished from one another by the
fact that a start label ends with a right angle bracket (>) and an end label
starts with a left angle bracket (<).
Note
It is possible for custom modes to display elements using more specialized rendering, and omit the start and end labels. For instance, a custom mode could distinguish “paragraph” elements through line breaks and indentation, and omit the start and end labels of these elements.

This figure contains a total of 8 labels: two start labels for two elements
p, and the corresponding two end labels, two start labels for two
elements hi and the corresponding two end labels.
Clicking on an element’s label selects the element and allows the user to perform actions on the element as a whole. When the element is selected, both the start and end labels are colored orange.

This figure shows a p element which is selected. Its labels are orange.
Right-clicking on an element label will bring up a contextual menu appropriate for the element. Start labels may contain the attributes
associated with the XML element to which the label belongs. For each attribute,
the label first shows the attribute’s name, followed by the equal sign (=)
and the attribute value in double quotes ("). The attribute’s value appears
in black on a white background.

This figure shows a p element with the attributes rend and style.
Modes may configure wed so that some elements are hidden if the caret is out of
a start label, but shown then the caret is moved inside the start label. Labels
that have hidden attributes will show an ellipsis (...) before the right
angle bracket (>).
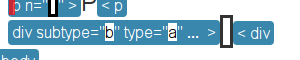
This figure shows a div element with the ellipsis that indicates some
attributes have been hidden.
When the caret is moved inside the start label, the hidden attributes are shown, and they are hidden again as soon as the caret is moved out of the start label.

This figure shows a div element with its hidden attributes shown.
Note
Attribute visibility is determined by the mode being used to edit the file, and how this mode is configured. The generic mode by default shows attributes. It is possible for an application using wed to configure the generic mode to hide attributes. Custom modes may be designed to hide attributes too.
Note
When a double quote appears as part of an attribute’s value, wed will show the double quote as a double quote. In other words, it does not visually escape it. However, wed does encode double quotes appearing in an attribute’s value properly.
Whenever the mode being used has provided element documentation, hovering over a label will bring up a tooltip with the documentation of the element.
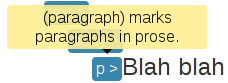
This figure shows a label for a p element whose tooltip is open. The
tooltip contains documentation on the element.
Note
Whether documentation is actually available depends on the mode being used and how the mode was configured and packaged with wed.
Element documentation is not provided by wed itself. The generic mode used in Wed’s demo is set to work with TEI documents, and thus provide documentations on TEI elements. This documentation was converted for use by wed but its contents was created by the authors of the TEI schema. Wed merely extracted it.
Label Visibility
The editing modes of wed can be designed to assign different levels of visibility to labels. Imagine for instance a mode that represents breaks in paragraphs through line breaks and indentation, or foreign text by showing it in italics, and so on. For each element that is represented on screen using styling, it is usually not necessary to show the end and start labels of the element: the presence of the element and its extent is already visible through styling.
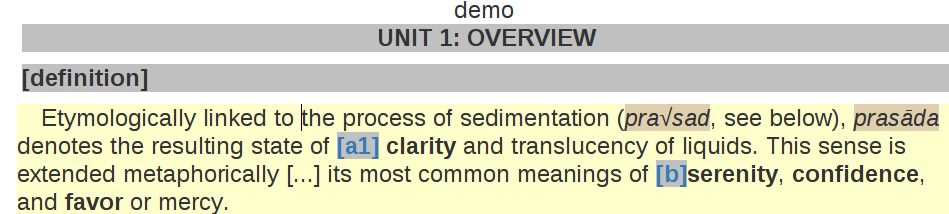
This is an example of the situation described above in the text.
It still may be useful sometimes for users to see the labels. Perhaps there is an operation they want to perform that is easier to do with labels. In such case, wed allows changing the label visibility level.
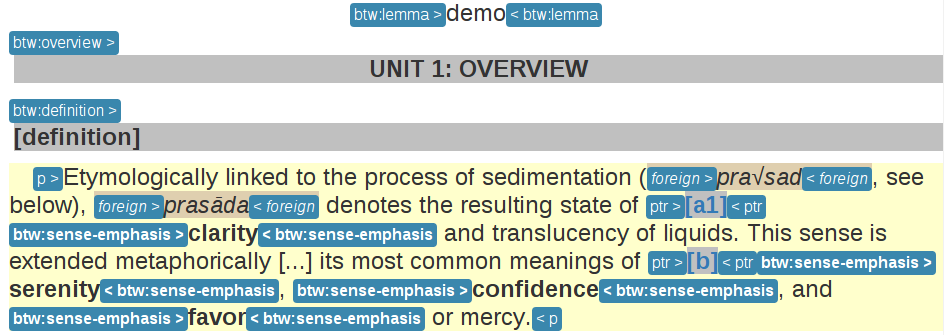
This is an example of the same document shown earlier but with increased
label visibility. You’ll notice that the word “prasāda” now has start and end
labels for foreign. Paragraphs also have the p element.
Error Markers
Error markers indicate where in the document there is a validation error. They appear as red rectangles at the location of the errors they mark.

An error marker appearing in an attribute value.
Clicking an error marker will expand the error pane if it was closed, and will scroll the pane to show the error message corresponding to the error marker. Both the marker and the error message will become selected. Selected markers and their message blink slowly to indicate that they are selected.
When an error marker is clicked, the marker and the error’s description become selected.
Contextual Menus
Right-clicking on element labels or in the text contained by elements or
attributes brings up a contextual menu. As the term “contextual” suggests, the
content of the menu is determined by the location where the contextual menu is
being invoked. In particular, the list of operations available in the menu is
determined by what the Relax NG schema that governs the editing session allows
in the specific location where the menu was invoked. For instance, if an element
allows only the attributes a and b, and b is already present on the
element, then the contextual menu that you get when right-clicking on the start
label of the element will show only an option to add the a attribute,
because adding a b attribute again would not be valid.
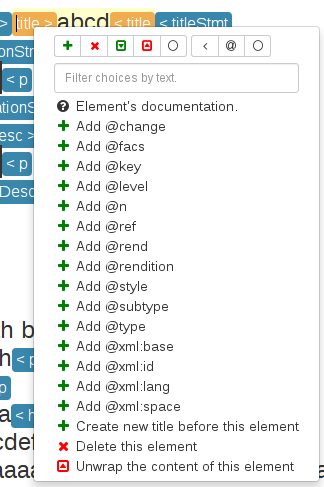
This is a contextual menu brought up on the start label of the title
element.
The top of the contextual menu contains buttons and an input field that allow filtering the list of options presented by the menu. When editing a document using a complex schema, there can be dozens of options available. Filtering helps finding the desired option quickly.
The input field filters the options that pertain to attributes or elements on the basis of attribute name or element name. It filters other options on the basis of the name of the option shown in the menu. When you bring up the contextual menu, the input field is focused automatically, so you can type in it right away, without having to focus it with the mouse.
The user brings up a contextual menu and filters options to those that
contain the text xml.
The buttons above the input field allow filtering the list of options according to characteristics other than text. The buttons are divided into two groups: the first group filters by the kind of operation performed, the second group filters by what kind of XML construct the operation affects. Hovering the mouse over each button will give you a description of the filtering performed by the button. The buttons in the first group filter as follows:
 filters the list of options to those that add content. For instance,
adding elements and attributes.
filters the list of options to those that add content. For instance,
adding elements and attributes. filters the list of options to those that delete content. For
instance, deleting elements and attributes.
filters the list of options to those that delete content. For
instance, deleting elements and attributes. filters the list of options to those that wrap content into an
element. For instance, wrapping text into a new element.
filters the list of options to those that wrap content into an
element. For instance, wrapping text into a new element. filters the list of options to those that unwrap content. For
instance, unwrapping an element.
filters the list of options to those that unwrap content. For
instance, unwrapping an element. filters the list of options to those that are not in one of the
previous categories.
filters the list of options to those that are not in one of the
previous categories.
The buttons of the second group filter as follows:
- < filters the list of options to those that perform operations on XML elements. For instance, if you select this filter, then all options that edit attributes would be removed.
- @ filters the list of options to those that perform operations on XML attributes. For instance, if you select this filter, then all options that edit elements will be removed.
- filters the list of options to those that are not in one of the
previous categories. Therefore, it would filter the list of options to remove
those options that perform operations on elements or attributes.
The first characters typed into the input field can serve to select the buttons listed above by means of the keyboard rather than using the mouse. When one of these keys is used to select a button, this key only performs the task of selecting a button but does not appear in the input field. The keys recognized are:
- + selects
- - selects
- , selects
- . selects
- ? selects in the first group of buttons. That is, it filters
options to those that do not add, delete, wrap or unwrap.
- < selects <
- @ selects @
- ! selects in the second group of buttons. That is, it filters
options to those that do not operate on elements or attributes.
- ESC resets filtering. It will clear all the filtering buttons and will clear the input field. If no filtering was in effect, then it will close the contextual menu.
Once a button has been selected, either with the mouse or by using one of the keys above, then the keys that select filters from that group no longer have for effect to select filters. Instead, they will be added into the input field, just like any other key. Here are some examples of this behavior:
- If the user opens a contextual menu and types
+, this will have for effect to select the button and filter the options to those that add
content. So far so good. Then if the user types -, this will not unselect to select instead. Rather, the -character will appear literally in the input field so that the end result will be that only options that add content and operate on attribute or elements which have-in their name. - If the user opens a contextual menu and types
+, and then@, the
and @ buttons will be selected and the list will show only those options that
add attributes. After the user types +, the keys associated with the first group of buttons cease to select buttons, but those associated with the second group continue to be available to select one of the buttons in the second group. Once@has been typed too, then none of the keys that select buttons perform button selections anymore.
Resetting filtering by typing ESC resets this behavior. In other words, the keys that select buttons become operational again.
It is possible to select an option from the contextual menu by using the up and down arrow keys on the keyboard and typing ENTER on the desired option. ESC closes the contextual menu without performing a selection, provided there is no filtering in effect, otherwise it will clear the filtering. If filtering is in effect, then using ESC twice in a row will close the contextual menu.
Completion Menus
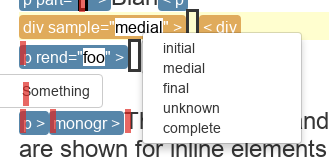
If the schema used to edit the document specifies an enumerated list of possible values, wed will present the user with a completion menu. A common case is for attributes that may take only a limited set of values. Upon first placing the caret in a location that can be auto-completed, wed will present the whole list of possible values.
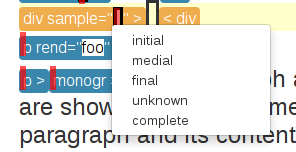
The user just clicked into the sample attribute. Wed presents the list of
possible values.
The user may use the arrows on the keyboard to go up and down the list of values to highlight a value, and hit ENTER to insert it as the attribute value. Note that hitting ENTER when no value is highlighted in the menu will insert the first value in the menu. Or the user may start typing a value at the keyboard. As a value is entered, the list of completions will be narrowed to those values that begin with the characters entered by the user. The matched prefix will be bolded in the list of values. The user may then use the keyboard arrows and ENTER to complete the value already begun. It is possible also to just type the whole value at the keyboard (which may be faster, in some cases, than fiddling with a menu), in which case the menu will close once the value is complete.

The user types med into the completion menu and then hits ENTER to
complete the value.
Replacement Menus
Replacement menus are similar to completion menus. Completion menus appear
automatically but only when the document contains a value that can be
completed. Given an attribute that has a limited set of possible values, if the
attribute is already filled with a complete value, then the completion menu does
not appear. Suppose an attribute height which can take the values high,
medium, low, and it is already filled with the value medium. If you
want to change the value, you won’t be able to use the completion menu, because
there’s nothing to complete since medium is already complete. So if you want
to change the value with the help of the editor, you have to use a replacement
menu by hitting Ctrl-?.
Replacement menus are available in the same places completion menus are available. The list of values they offer is the same as the list provided by a completion menu in the same location. Choosing an item from the list in a replacement menu replaces the entire attribute value with the item selected.
Note that replacement menus, contrarily to completion menus, do not support changing the document while the menu is open. You need to exit the menu before you can continue editing the document. If you don’t want to make a change, click outside the menu or hit ESCAPE.
The user just brought up the replacement menu in the sample attribute.
Kinds of XML Operations
Wed divides operations on elements and attributes into a few categories:
- Adding. Such operations are usually marked with the symbol. These are
operations that add entirely new elements or attributes to the document. They
normally do not operate on selections.

The user adds an abbr element to the document.
- Deleting. Such operations are usually marked with the symbol. These
are operations that remove whole elements or attributes from the
document. They normally do not operate on selections.
The user deletes an abbr element from the document.
- Wrapping. Such operations are usually marked with the symbol. These
operations add an element around a section of the document being edited. The
section is indicated by clicking and dragging with the mouse to select a part
of the document. Therefore, wrapping operations appear in the contextual menu
only if a selection is in effect. They “wrap” the selection in a new element.
The user wraps text in an abbr element.
- Unwrapping. Such operations are usually marked with the symbol. This
is the reverse of wrapping. These operations operate on an element so as to
remove the element but put the element’s original content in place of the
element being removed. They normally do not operate on selections.
The user unwraps the content of an element.
Searching
Wed offers two types of searches: quick searches, and dialog searches.
Moreover, wed will search through text in two possible contexts. Do not confuse context and scope. The scope is the range of the document within which the search operates. The context determines what in this range is part of the search. Here are the two contexts:
Element text. This encompasses only the text of elements. For instance, searching for
somein the XML<some.element some.attribute="some value">some text</some.element>would only hit the wordsomethat appears before the wordtextand nothing else.Note that because this context ignores the XML tags, it is possible for it to perform matches across element boundaries. For instance if you search for
I
am happy
in the XML<p>I <bold>am</bold> happy</p>, the search will match the entire content ofp. That is, theboldelement does not prevent the match.Attribute values. This encompasses only the values of element attributes. In the example above, a search for
somewould match only the wordsomeappearing beforevalue.Note that this kind of search does not span attributes. For instance, if you have
<p type="abc" subtype="def"/>and search forabcdefyou will not get a match that spans the values of@typeand@subtype. This is probably not a desirable behavior at any rate, but we’re mentioning it, just in case.
It is not possible to search for element names or attribute names with the quick search or dialog search. Nor is it possible to search for text which is purely created for the sake of displaying the XML. Here’s an example of the latter. Suppose the following document:
<doc>
  <p>
   Johnson demonstrated (<ref target="/some/bibliographical/item"/>) that ...
  </p>
</doc>
In this example, ref is a reference to a bibliographical item. Your wed
mode, fetches the bibliographical information and shows it instead of showing
the XML element as-is. So what you see is something like:
doc >
 p >
  Johnson demonstrated (Johnson, Five Ways to Eat Sushi) that ...
 < p
< doc
doc >, p >, p < and < doc are the start and end labels that
normally shows for elements. The string Johnson, Five Ways to Eat Sushi is
text that is not part of the XML but that the editing mode adds when it shows
you your document. It is more informative than <ref
target="/some/bibliographical/item"/>. At any rate, neither searching through
element text or element attributes can find that text.
If you need to search for element names, attribute names or text created for display purposes, you must use your browser’s built-in search.
Quick Search
You can use Ctrl-f to quick-search forward, and Ctrl-b to quick-search backwards. When you hit either of these shortcuts, the minibuffer becomes active and prompts you for a search term. As you type the term you are searching for, wed will search through the document and highlight in yellow the term it finds. To move to another hit, press Ctrl-f or Ctrl-b again. Type ESCAPE to end the search.
If you have a selection in effect when you start the search, the search will be scoped to that selection. That is, the search will only search between the start and end of the selection. (The selection disappears while you are searching: this is normal and a current limitation of wed.) If you have no selection in effect when you start the search, then the whole document will be searched.
The minibuffer.
In the example above, the minibuffer is prompting the user for a quick search, forward in the document. You can see the word “original” was found and highlighted in yellow. When you hit the end of the search scope in either direction, the highlight will disappear. If you then hit the shortcut to continue in the same direction you were going, the search will continue from the start of your search scope.
Dialog Search
You can use Ctrl-Shift-f to search forward, and Ctrl-Shift-b to search backwards. Dialog searches are thus named because they bring up a dialog box to provide the user with more search options than the quick searches.
Just like quick searches, if you have a selection in effect when you start the search, the search will be scoped to that selection. That is, the search will only search between the start and end of the selection. (The selection disappears while you are searching: this is normal and a current limitation of wed.) If you have no selection in effect when you start the search, then the whole document will be searched.
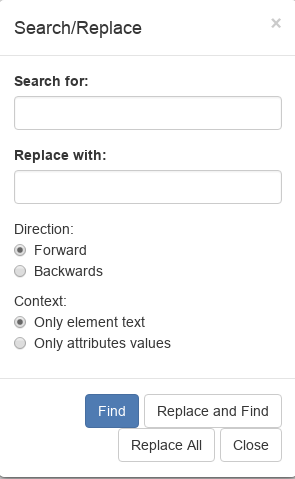
A dialog search.
The “Search for:” field is where you type the term you are searching for.
The “Replace with:” field is where you type the text you want to use to replace the hits you find.
The “Direction”: buttons determine in which direction the search goes. The direction is initially determined by which shortcut you use to bring up the search but you may change it later if you want.
The “Context:” buttons determine what is searched. There are two possible contexts:
- “Only element text”: this searches only through the text of elements. Consequently, attributes are not searched.
- “Only attributes”: this searches only through the attribute values of elements. Consequently, the text of elements is not searched.
The buttons:
- “Find” looks for the next match.
- “Replace and Find” replaces the current match and finds the next.
- “Replace All” replaces all matches until the search reaches a boundary of the search scope currently in effect. The boundary depends on the direction of the search. If searching forward, the boundary marking the end of the search is the end of the scope. If searching backwards, it is the start of the scope.
- “Close” closes the dialog.
Warning
Wed cannot replace hits that select an ill-formed portion of an XML
document. For instance, you have the XML tea<bold>pot</bold>
and you search for ap. If we mark the start and end of the hit
with the element mark we’d have
te<mark>a<bold>p</mark>ot</bold>. This is not well-formed XML
because mark and bold are straddling. Wed cannot replace
such cases, and will disable the “Replace and Find” button when you
land on such a case.
Note however that the “Replace All” button is never disabled. When you use “Replace All”, wed replaces all instances that it can replace.
Saving
You can save by using Ctrl-s or whatever means provided by the application that uses wed. Possible outcomes:
The data is saved. You will see a message telling you that the data was saved, and the save status will indicate the data was saved.
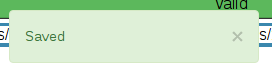
This is the message that a user gets when a document was saved.
Wed is disconnected from the server. You will get a dialog box saying:
It appears your browser is disconnected from the server. Editing is frozen until the connection is reestablished. Dismissing this dialog will retry saving. If the operation is successful, you’ll be able to continue editing. If not, this message will reappear.
You’re effectively prevented from further edits until wed is able to reestablish connectivity with the server.
Note
It is possible to configure wed to use other types of saving mechanisms than sending data to a server. For instance,
localStoragecan be used to record data in the browser itself. What mechanism wed uses depends on how the application in which wed is used has configured wed.The server responded to the save request with a message that indicated that the document being edited with wed changed on the server. In other words, while you were editing a document someone else edited and saved the same document, or an automated process modified the document. You’ll get a dialog box with the following message:
Your document was edited by someone else since you last loaded or saved it. You must reload it before trying to edit further.
On reload, wed will acquire a fresh copy of the document from the server. The edits you performed on your document will be lost. Wed is not currently equipped to deal with concurrent modifications from multiple sources.
Note
This is another instance where application that makes use of wed is the party responsible for providing the means to resolve concurrent modification conflicts or prevent them from happening in the first place.
The solution is really application-specific. For BTW we decided that locking documents to prevent concurrent modifications was the right solution. Another project could conceivably decide to solve conflicts in a way similar to what
gitdoes for merge conflicts. There’s no single answer here.There is an application-specific error which prevents saving the data. You will see a message in a red notification bubble telling you what error happened, and the save status will not be updated. The content of the error message depends on the specific nature of the error. For instance, an application which requires that documents be given titles before they are saved could report an error if you try to save a document without a title.
Copy, Cut and Paste
Wed allows copying, cutting and pasting parts of a document. When you perform a copy operation, the data is copied from the document to the clipboard. When you perform a cut operation, the data is copied from the document to the clipboard, and is also removed from the document. When you perform a paste operation, the data is copied from the clipboard to the document. This is not specific to wed but is the standard way software manipulates the keyboard.
Note
Readers needing more details about how copy, cut and paste interact with the clipboard should consult general-purpose documentation about how to use computers.
Wed supports two selection modes:
- Span mode: a mode by which you must select a span of the document to operate on. This is similar to how you would select text in common plain text editors like Notepad or word-processors like Word.
- Unit mode: a mode by which you direct the editor to copy or cut entire XML structural units, like attributes or elements.
You can use the toolbar or Ctrl-SPACE to change the selection mode. Wed operates in a way that prevents mixing data from the two modes described above. If you start copying data to the clipboard in span mode, then switch to unit mode and copy more data, then the data you copied in span mode will be removed from the clipboard. The same is true if you start in unit mode and switch to span mode.
Span Mode
This mode works mostly like how copy, cut, and paste works in plain text editors like Notepad, or word-processors like Word. You select a span of the document and direct the editor to perform an operation on it. However, because wed edits XML, there are some limitations to what you can do.
Copy
Copying contents as XML works only if the selection being cut starts and ends inside the same XML element or the same XML attribute value. The selection can span over XML elements, provided that it completely contains these elements. If your selection straddles XML elements, then it will be copied naively, and you will get a notification telling you that your selection was copied as such.
Note that “copied naively” here means that the content will be copied by the browser itself, as if you were copying text from any web page. This means that any decorations that wed creates and is part of the selection, will have its textual content copied.

This selection cannot be copied as XML because it begins in one p
element but ends in the subsequent p element.

This selection can be copied as XML because it begins and ends in the same
p element. There is an lb element inside the selection, which is
fine.
Cut
Cutting will work only if the selection being cut starts and ends inside the same XML element or the same XML attribute value. The selection can span over XML elements, provided that it completely contains these elements.
This selection cannot be cut from the document because it begins in one p
element but ends in the subsequent p element.
This selection can be cut from the document because it begins and ends in the
same p element. There is an lb element inside the selection, which is
fine.
A selection that cannot be cut can still be copied.
Paste
Wed will attempt parsing the pasted text, and if it is a well-formed XML
fragment, it will insert into your document the parsed XML, even if the
original document was plain text. Here’s an example. Suppose you have a plain
text editor opened, and you have the text <foo>something</foo> in it. If you
select that text and paste it into wed, wed will create a foo element that
contains the text something. It will not paste the text
<foo>something</foo> as text.
If the text in the clipboard is not well-formed XML, then wed will insert it
into your document as text. So if you have the copy the text <foo blah</foo>
from your plain text editor, and paste it into wed, this will be pasted as
text.
Note that pasting into attribute values always pastes the clipboard data as text because attributes cannot contain anything else than text.
Unit Mode
In unit mode, the editor copies entire XML structural units. There are two kinds of XML structural units that wed operates on:
- attributes,
- elements.
Note
We talk of “units” because other candidate terms already have specific meanings in XML. We cannot talk of “elements mode” because XML elements are just one specific type of XML structure, and the mode also works on attributes, which are not elements. We cannot talk of “entities mode” because entities are another specific XML structure. “Unit” was one term that does not already have a special meaning in basic XML parlance.
Besides operating on XML structural unit, unit mode also allows a kind of operation that span mode does not allow: it allows adding to the contents of the clipboard instead of replacing it. So besides copy and cut, you can also copy-add and cut-add.
Indicating Units
In this mode you do not use a selection to indicate which unit you want to operate on. Indeed, you cannot set a selection while in unit mode. Instead, when you copy or cut, the editor will copy or cut the smallest unit enclosing the current caret position. We call it the “smallest enclosing unit”, for short.
Note
People who are used to think of XML as a tree of nodes might find it easier to use an alternative way to think about how units are selected. The “smallest enclosing unit” is always equivalent to the tree leaf that immediately contains the caret, with the caveat that text nodes are ignored. For instance, if one imagines the XML document as a DOM tree and the caret is in a text node, then the smallest enclosing unit is the element which contains the text node, not the text node itself.
Look at the following example:
In this example, the caret is in the rend attribute of the first p
element. The units that enclose the caret are:
- the attribute
rend, - the element
p(the first one), - the element
body, - the element
text.
rend is the smallest enclosing unit because all other enclosing units
contain more data than rend does. For instance, p contains another
attribute besides rend and contains text.
Consider this example:
In this example, the caret is in the text of the first p element. The units
that enclose the caret are:
- the element
p(the first one), - the element
body, - the element
text.
p is the smallest enclosing unit because all other enclosing units contain
more than p. For instance, body contains two other elements besides the
p element in which the caret is located.
Consider this similar example:
In the example, the caret is at the start of the start label for the element
p. Since it is outside of any attribute, then the smallest enclosing unit is
like in the previous example: the first p element.
Consider this example:
In this example, the caret is just before the first p element in
body. The caret is not in any of the elements that are children of body
(the two p elements and the div element). The smallest enclosing element
is body.
Copy and Cut
Performing a copy replaces the data in the clipboard with the smallest enclosing unit. A cut is the same as a copy, except that the data that is put into the clipboard is also removed from the document.
Copy-Add and Cut-Add
The keyboard shortcuts for these operations are those for the non-adding operations but with the alphabetical letter capitalized. So whereas a plain copy operation is Ctrl-s, the copy-add operation is Ctrl-Shift-s. The practical difference is that the user must hold the Shift key to get the “-add” variant. (On OS X, the corresponding combinations are :kdb:`Cmd-s` and :kdb:`Cmd-Shift-s`. Again, the practical difference is whether or not the Shift key is held.)
A copy-add operation adds the smallest enclosing unit to data already
in the clipboard. Suppose you are in unit selection mode, and you put your caret
in an attribute named a and do a copy. The clipboard data is replaced with
the attribute a. Then you put your caret in an attribute named b and do
a copy-add. The attribute b is added to the attribute already in the
clipboard, so that the clipboard will contain two attributes: a and
b. If you had done a copy instead of a copy-add when you were in b, then
the clipboard would contain only one attribute, the attribute b.
The same thing happens if you place your caret to select elements instead of
attributes. You could copy into the clipboard an element p from the start of
your document, and then copy-add an element quote from the end of your
document. The clipboard will contain both elements.
It is important to note that the “..-add” operations do not allow mixing heterogeneous units in the clipboard:
- if you copy an attribute into the clipboard and then copy-add an element, the copy-add operation will do nothing, and you will get a notification.
- if you copy an element into the clipboard and then copy-add an attribute, the copy-add operation will do nothing, and you will get a notification.
As usual, the only difference between copy-add and cut-add is that the cut-add operation copies to the clipboard but also removes the copied data from the document.
Pasting
Note that because wed is an XML editor, there are a special considerations regarding how attributes are handled. Wed does not ever violate the general XML rule that elements cannot hold the same attribute twice. For instance, this is not well-formed XML:
<p n="value one" n="value two">text</p>
Wed does not allow you to create this kind of structure. The consequence of this is that if you use the copy-add or cut-add operations on an attribute you have already put into the clipboard, then you are changing the value of that attribute in the clipboard. Consider the following XML:
<p n="value one">First paragraph</p>
<p n="value two">Second paragraph</p>
<p n="value three">Third paragraph</p>
Suppose you set the editor to unit selection mode, and put your caret in the
n attribute of the first paragraph and copy it. The clipboard contains
n="value one". Then you put your caret into the n attribute of the
second paragraph, and copy-add it. Because of the XML rule mentioned above, the
clipboard will contain n="value two". It will not contain two n
attributes.
This XML rule against duplicate attributes applies when pasting too. In the same example above, if after the operations described earlier, you move the caret to the third paragraph, and paste, then the paragraph will be changed to:
<p n="value two">Third paragraph</p>
It will not get two n attributes.
Undo and Redo
Wed maintains a list of the operations that have been performed on the document being edited. This list is created anew with each editing session. In other words, each time you open a document with wed, it creates a new list. You can use Ctrl-z to undo the last operation. Undoing again, will undo the operation before the last one, etc. You can undo as many editing operations as you want, up to the start of the undo list. Conversely, Ctrl-y will redo the operation that was just undone. It is useful in cases where you’ve undone more than you meant to.
Keyboard Shortcuts
“Shortcut” is a bit of a misnomer, since some of the functions mentioned here are available only through the keyboard, but we’ll stick with it.
In the following table, key names that are more than one character specify the
keys name. For instance, SPACE is the space bar on the keyboard.
| PC Key | Mac Key | Function |
|---|---|---|
| F1 | F1 | Bring up the help. |
| Ctrl-/ | Cmd-/ | Bring up the contextual menu. |
| Ctrl-? | Cmd-? | Bring up the replacement menu. |
| Ctrl-[ | Decrease the label visibility level. | |
| Ctrl-] | Increase the label visibility level. | |
| Ctrl-SPACE | Ctrl-SPACE | Switch to the next `selection mode <Cut, Copy and Paste_>`_. |
| Ctrl-z | Cmd-z | Undo an operation. |
| Ctrl-y | Cmd-y | Redo an operation. |
| Ctrl-c | Cmd-c | `Copy <Cut, Copy and Paste_>`_ content. |
| Ctrl-Shift-c | Cmd-Shift-c | `Copy-add <Cut, Copy and Paste_>`_ content. |
| Ctrl-x | Cmd-x | `Cut <Cut, Copy and Paste_>`_ content. |
| Ctrl-Shift-x | Cmd-Shift-x | `Cut-add <Cut, Copy and Paste_>`_ content. |
| Ctrl-v | Cmd-v | `Paste <Cut, Copy and Paste_>`_ content. |
| Ctrl-s | Cmd-s | Save content. |
| Ctrl-f | Cmd-f | Quick search forward. |
| Ctrl-b | Cmd-b | Quick search backwards. |
| Ctrl-Shift-f | Cmd-Shift-f | Dialog search forward. |
| Ctrl-Shift-b | Cmd-Shift-b | Dialog search backwards. |
Browser Requirements
Wed is primarily developed using a recent version of Chrome. (But see a note about Chrome 34 below.)
Here is the list of officially supported browsers, in order of decreasing priority. The higher a browser is in the list, the less likely you are to run into issues and the higher the priority for resolving bugs happening with this browser.
- The latest stable version of Chrome.
- The latest stable version of Edge, but see the section on Edge.
- Versions of Chrome or Edge older than the latest stable version, but not very old. (Yeah, this is vague. Sorry about that.)
File an issue on github if you find a problem with one of the supported browsers above.
We would like to support phone and tablet browsers but due to a lack of development resources, such support is unlikely to materialize soon. In decreasing order of likelihood, the following cases are unlikely to ever be supported:
- Versions of Chrome or Edge older than those mentioned above.
- Firefox. It deserves its own discussion.
- IE. Support for IE 11 has become too costly. Resuming support for IE is extremely unlikely, because wed has accumulated features and methods that do not work on these browsers.
- Chrome 34: the luminaries at Google decided to remove
Attr.ownerElementfrom Chrome 34. It was reintroduced in Chrome 35. We’ll probably never have support for Chrome 34. - Antique browsers.
- Oddball browsers or other software or hardware systems that present web pages. (E.g. gaming consoles, smart TVs.)
- Operating systems or browsers no longer supported by their own vendors.
Edge
Cut-copy-paste are not working well in Edge, and there is currently no development resource available to devote to it. The root cause is that the luminaries who develop Edge cannot be bothered to implement the clipboard API correctly. See:
- https://developer.microsoft.com/en-us/microsoft-edge/platform/issues/14080506/
- https://developer.microsoft.com/en-us/microsoft-edge/platform/issues/14110451/
At the time of writing this, the bugs were reported over a year ago: response from Microsoft… crickets.
Firefox
We’re hoping that the lack of Firefox support is going to be temporary. The paragraphs below give the state of Firefox support, in reverse chronological order (most recent on top):
Update August 2018: Firefox support is still suspended. Geckodriver is plagued by asinine regressions like this one Returning DOM elements is supported on all browsers and has been supported by Selenium since time immemorial, but they managed to screw it up. sigh
Update November 2017: Firefox support is still suspended. The Marionette driver has been released. However it is so buggy that there’s no way we can run our tests with it. And yes, we do mean “buggy” with the full force of that word. For instance, the WebDriver specs specify that performing a click on an element should scroll the element into view. Our tests rely on this, but Marionette does not implement the scroll, which causes failures during testing.
Update Summer 2016: things are looking up. The Firefox developers have been working on a driver named “Marionette” that should solve the support problems. Stay tuned.
February 2016: For years, wed was supporting Firefox. Early on, Firefox was even better supported than Chrome. However, the people responsible for maintaining Selenium decided to stop supporting native events in Firefox and forced developers to use synthetic events instead. The problem is that Selenium’s support for synthetic events on Firefox is unable to accurately reproduce what happens when a user is actually interacting with a browser, which is the entire point of using Selenium in the first place. The problem has been reported, at length:
- In the selenium-developers group here and in following replies.
- And these unresolved bugs here, and here.
- And these resolved bugs here and here.
It is taking forever for the problem to get resolved. In the meantime, we have no resources to devote to solving the issue of synthetic event support in Firefox and so Firefox support has been temporarily pulled.
IE11
We no longer support any version of IE. The benefit/cost ratio does not make it viable for us to continue supporting IE. If you want to bring back support for IE 11 you’ll have to champion it: concretely, this means you need to provide the development time to support it.
If somehow we were to reintroduce IE 11 support, we’d still be facing the following issue. At some point in 2017 Selenium, IEDriver, or something else changed in such a way that makes the test suite run incredibly slowly on IE11. Wed itself runs at normal speed, as we can assess by running it manually in IE11. We’ve looked for a solution but could not find one. Tracking down what broke is more work than we can spend on this now. We accept bug reports due to issues on IE11 and accept patches that would resolve the slowdown on IE11.
It is perhaps related to a bug whereby keystrokes are extremely slow in IE11, but we’ve tried the solutions outlined there and nothing worked.
OS X
Warning
If you are using any version of OS X that hides scroll bars by default, you probably want to modify your OS X settings so that scroll bars are always shown. Otherwise, there are situations where you won’t know about contents being scrollable. If you need help doing so, see this blog post. Note that wed will work either way, and you will be able to scroll either way, but wed relies on the traditional scroll bar behavior to indicate that something can be scrolled. So if you do not make the change above, you can end up in situations where something is scrollable without having any visual indication that it is.
The test suite depends on native events to do its work, but support for native events in OS X is spotty:
- Chrome: it is possible to generate some native events.
- Firefox reports that it does not support native events at all.
- Safari does not support native events at all.
Your best bet in OS X is to use Chrome because we can’t run the test suite with Firefox or Safari.
Safari
Safari is a vexing case. Wed may or may not work on Safari. We currently cannot run the automated test suite with Safari. Manual testing is out of the question.
We would like to have wed be supported on recent versions of Safari to the same extent it is supported on recent versions of Chrome. The tool we use to test it is Selenium. For better or for worse this is the go-to tool to do the kind of test wed needs. We’ve not seen evidence of any collaboration between the Selenium project and Apple. Thus testing support for Safari is deficient, and it is not something that we here have the resources to fix.
If you desire that wed be actually tested on Safari and are in a position to contribute substantial monetary or technical resources towards this goal, you are welcome to contact us. In particular, immediate problem we’ve run into when trying to test on Safari is this Selenium issue. If you want fix it, then this would bring us one step closer to being able to test wed on Safari. And regarding the state of Selenium support for Safari, take note this response from a Selenium project member:
Safari is not a priority, sorry. But your patches are welcome!
Absent these patches, wed is unlikely to support Safari.
Complex Name Patterns
When you open the contextual menu to check what it is possible to insert in a document you may see a menu item with an exclamation mark, labeled “Complex name pattern”. What’s the deal?
Brief Explanation
In brief, this occurs if the Relax NG schema uses a wildcard (so to speak) that allows an unlimited number of possibilities for the name of an element or of an attribute. (Or a set of possibilities that cannot be expressed as a set of positive matches.) Wed is able to validate such documents. However its capability to edit them is currently limited. Wed will actually mark as read only elements and attributes that are allowed only due to a wildcard. These may not be modified in wed. The menu item that wed shows is a warning that the schema allows for more than what wed is able to do. If this is a problem for you, you should contact whoever provides you with technical support to discuss the problem. You may direct them to read the explanation that follows.
Long Technical Explanation
A Relax NG schema normally constrains the set of possible valid structures to a limited set. Take the following schema:
start = element a { (element b { empty } | element c { empty })+ }
If we have finished reading the start tag for a, then there are only two
possibilities: either a start tag for the element named b or a start tag for
the element named c. However, Relax NG allows schemas that effectively say
“any element is fine here”. For instance:
start = element a { any+ }
any = element * { any* }
The * that appears after the second element tells the validator that any
element name is possible. With this schema, once we’ve processed the start tag
for element a, then it is possible to encounter any element whatsoever. This
is a problem for wed because, in addition to validation, it provides guided
editing.
For now, we’ve decided that wed will not support such patterns in editing. Why? In our experience, these patterns are normally used to provide opportunities to expand a schema. An excellent example is DocBook, which has provisions for including XML structures encoded according to the MathML or SVG schemas. From the standpoint of validating the document it makes good sense to have the DocBook schema declare that some elements will allow any element, provided that they come from the MathML or SVG namespaces. There are scenarios where it is not necessary to know anything about MathML or SVG. This is fine insofar as validation is concerned.
However, when editing to add a MathML section to a DocBook document, there’s a problem. Suppose a user wants to add a formula encoded with MathML to a DocBook document, and user is using the default DocBook schema. The only thing wed has to help the editing is “any element from MathML is valid here”, because this is what the default schema says. What are the consequences?
- First, wed is unable to check that the MathML is in fact valid MathML. The DocBook schema does not contain any information regarding what is valid MathML. It allows anything and everything, so long as it is declared to be in the MathML namespace. It therefore allows constructs that may not be valid MathML. (Note that wed is just following what the schema specifies, no more, no less.)
- Second, wed would have to prompt the user for every element and attribute name. For every MathML element to be added, the user would get a dialog box and have to enter an element’s name, because wed has no finite set of options to choose from. Editing becomes a slog.
We’ve estimated that it is not worth adding to wed any facilities to support scenarios like the one just described. If someone wants to edit DocBook documents that allow MathML, they should provide wed with a DocBook schema that has been merged with the MathML schema so that the final schema uses the actual elements specified by MathML rather than say “anything from MathML is valid here”. This takes care of the problems mentioned above.